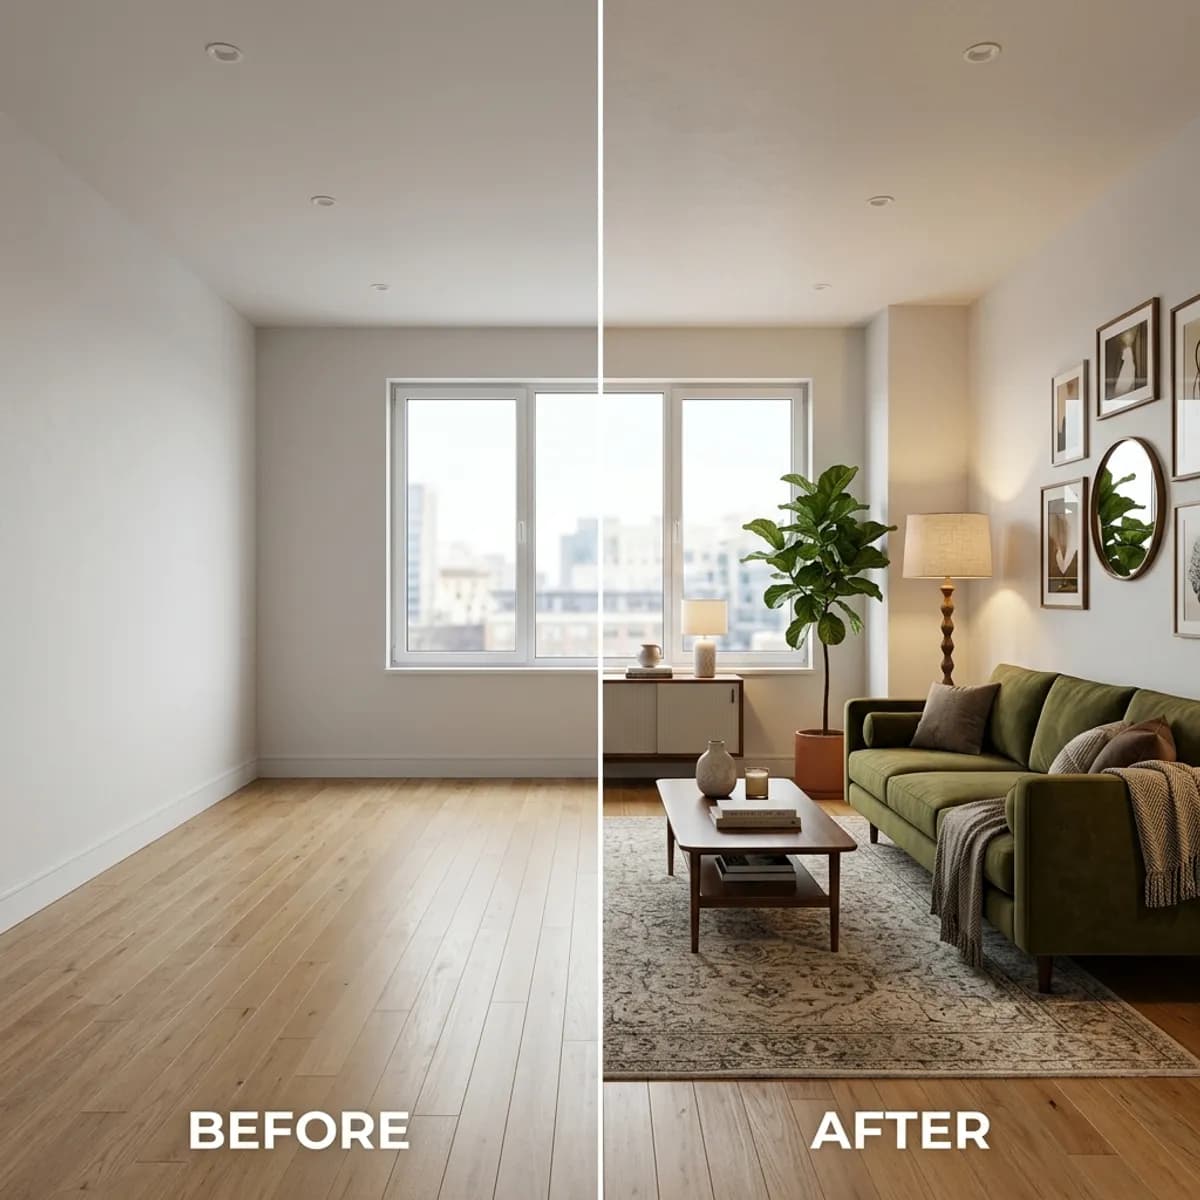
Empty rooms sell poorly. That is not a marketing claim but a question of perception: an unfurnished room gives the viewer no sense of scale, no idea of use and nothing to connect with emotionally. It looks smaller, colder and more arbitrary than it is.
Conventional home staging solves this with real furniture – with the corresponding effort for rental, transport, installation and removal. Virtual home staging solves it in the image: the empty room is photographed and then furnished digitally. For agents, portfolio owners and property managers this is the faster option and considerably simpler to organise – provided you understand the process, its limits and the labelling obligation.
This article describes both: how virtual home staging is technically produced, and where it reaches its limits.
What virtual home staging is – and is not
Virtual home staging means inserting three-dimensionally computed furniture and fittings into a real photograph of an empty room so that a realistic overall impression results. The output is a composite image: real architecture, virtual furnishing.
Three related services are frequently confused with it and should be distinguished.
Digital decluttering removes existing objects from an image – moving boxes, stored furniture, personal photographs. Nothing is added here; retouching takes place and the concealed background is reconstructed.
Virtual renovation changes surfaces: new flooring, painted walls, different tiles, renewed doors. This alters the physical condition – legally a considerably more sensitive intervention than furnishing, because defects can disappear in the process.
Rendering generates the entire image synthetically, with no photograph as a basis. That is the route for properties that do not yet exist.
The distinction is not academic. It determines the labelling and the legal risk. Furniture is recognisably decoration. An altered wall surface is a statement about the condition of the property.
The workflow in detail
Step 1: The photographs
Image quality is the limiting factor. Virtual staging cannot rescue a poor photograph – it tends to make its weaknesses more visible, because inserted objects are perfectly sharp and a blurred background then stands out.
Usable source images meet a number of conditions. The camera is level, so that vertical lines in the image stay vertical; converging verticals make perspective fitting considerably harder. The shooting height is around 1.20 to 1.50 metres. Enough of the floor is visible, because that is where the furniture stands – an image that cuts off the floor at the bottom edge can hardly be furnished convincingly. Exposure is balanced, with detail retained in the windows and shadows that have not gone black. And the room is genuinely empty, or at least largely cleared.
The last point is often underestimated: existing objects have to be retouched out before furnishing can begin. That is an additional step with its own potential for error, particularly where furniture conceals floor areas or wall junctions that then have to be reconstructed.
Information that does not emerge from the image is a useful addition: the room size, ideally with a floor plan, and the orientation of the windows.
Step 2: Reconstructing the perspective
For virtual furniture to stand in the room like real furniture, the camera perspective of the photograph must be reconstructed. Vanishing points are determined from straight edges in the image – wall junctions, door reveals, window frames, floor joints – and from these the focal length, camera height and direction of view are derived.
This reconstruction is the basis for everything that follows. If it is wrong, the inserted objects tilt relative to the architecture, and furniture appears to float or to sink into the floor. That is the most conspicuous fault in cheaply produced staging and the reason such images are immediately recognised as manipulated.
The room geometry is then roughly rebuilt: floor, walls, window openings. This auxiliary geometry is not visible in the final image but is needed so that furniture is correctly occluded and shadows can fall onto real surfaces.
Step 3: Selecting the furnishing
Now the furnishing is assembled. Professional 3D model libraries are used, with sofas, tables, beds, lighting, rugs, plants and decoration.
The editorial decision matters more than the technical one: who is being furnished for? A family apartment needs a dining table for four to six people and recognisable children's rooms. An investor unit is furnished neutrally and plainly. A penthouse can carry larger and more distinctive pieces. A home-office room benefits from actually being shown as a workplace.
Scale is the critical point. Every piece of furniture must plausibly fit the real room size. A three-seater in a twelve-square-metre room is a common error with a direct consequence: the prospective buyer who notices at the viewing that their own sofa will not fit loses confidence in the entire listing.
A reliable rule of thumb: the virtual furnishing should be walkable. Circulation routes of around 80 centimetres, at least 60 centimetres between dining table and wall, adequate distance between sofa and coffee table. Sticking to this produces images that survive the viewing.
Step 4: Matching the light
For the inserted furniture to belong to the photograph, the virtual lighting must reproduce the real lighting situation in the image. Direction, hardness and colour of the light are analysed: where does the daylight come from? Are the shadows hard, meaning direct sun, or soft, meaning an overcast sky? What colour temperature does the light have?
This analysis is rebuilt in the 3D scene. The virtual objects then cast shadows in the same direction as the real building elements in the photograph, and their surfaces carry the same light colour.
The second most common error after wrong perspective is found precisely here: furniture without shadows, or with shadows in the wrong direction. A sofa without a contact shadow on the floor looks pasted on, even when it sits correctly in perspective.
Step 5: Computation and compositing
The furnished scene is computed, usually in several separate layers: the objects themselves, their shadows, their reflections. These layers are then laid over the photograph and adjusted individually in strength and colour.
This structure is the reason professional staging costs more than simply pasting in photographs of furniture: it allows every component to be matched separately to the source image.
Step 6: Matching and finishing
In the final step the image is made homogeneous. The real photograph has image noise, a certain softness towards the edges, a particular colour characteristic from the camera and often slight vignetting. The computed objects have none of that – they are technically perfect.
That perfection is a giveaway. It is therefore deliberately reduced: noise is matched, minimal blur is added, the colour characteristic is adapted. Only this step decides whether the image reads as a single photograph.
Labelling: not optional
Virtually furnished image material must be labelled as such. This is not a question of style or a voluntary commitment but the condition under which the depiction is not misleading.
In practice that means a caption directly on the image, not in small print at the end of the listing. A formulation such as "virtually furnished – furniture not part of the property" is unambiguous and sufficient. Attribution matters: in a series mixing furnished and unfurnished shots it must be apparent which image has been edited.
A further measure is worthwhile and effective in practice: place at least one unedited image of the empty room alongside. That builds trust, prevents arguments at the viewing and costs nothing.
The second and more important rule: no defects may be concealed. A sofa in front of the damp patch, a rug over the damaged floorboard, a plant in front of the crack in the wall – that is no longer staging but the concealment of a characteristic material to the purchase decision. Where a defect is visible in the source image, it must remain visible in the staged image.
For the same reason virtual renovation is the considerably more sensitive discipline: painting walls or replacing floors alters the condition of the property in the image. Such images belong unmistakably labelled as a design proposal and must never be used as documentation of condition.
These remarks are a general orientation drawn from practice and do not replace legal advice.
Limits and typical mistakes
Staging does not replace good photography. A crooked, dark or noisy source image stays poor. The investment belongs in the photograph first.
Not every room benefits. Very small rooms, windowless hallways, basement rooms and bathrooms with large tiled areas gain little. With bathrooms there is the added point that the fittings are permanently installed – virtually added sanitary ware in a real bathroom is highly problematic, because it alters the physical condition.
Too full is worse than empty. Overcrowded rooms produce exactly the disappointment that was to be avoided. Less, at the correct scale, is more effective.
The style must suit the property. Scandinavian design in a period building with cornicing looks imposed. The furnishing should support the architecture, not work against it.
Perspectively difficult situations stay difficult. Rooms with sloping ceilings, unusual layouts, several levels or strong reflections take more effort and are more prone to error. Large mirrors and glazed areas are particularly critical, because a virtual piece of furniture would consistently also have to appear in the reflection.
At the viewing the image is put to the test. The prospective buyer stands in the empty room. If the impression differs strongly from the image, mistrust arises that transfers to every other statement made. Staging should enable imagination, not show a different room.
Letting and selling are different situations. In lettings the flat is usually handed over empty, and the connection between image and handover condition is experienced more directly. Restraint is appropriate here.
When virtual staging is worthwhile
It is useful above all for vacant flats and houses after a move-out, for properties with an unusual layout whose use needs explaining, for new builds shortly before completion where no furniture is yet in place, and for existing properties from receivership or an estate, where conventional staging is organisationally difficult.
It is less useful for furnished, occupied properties – digital decluttering is the more appropriate route there – and for properties in need of renovation that are expressly marketed as such. If you offer a property "for doing up", you should show it that way.
Conclusion
Virtual home staging is a craft process with clear steps: a good source photograph, reconstruction of the perspective, furnishing chosen to scale, matched lighting, separate computation and adaptation to the characteristics of the photograph. Quality is decided by perspective, shadows and scale – not by how high-end the furniture models used are.
The most important point, however, lies outside the technology: label edited images visibly on the image, conceal no defects, and furnish so that the viewing confirms the image instead of refuting it. Staging that exceeds expectations generates appointments; staging that disappoints them generates withdrawals.
You will find the scope of services under virtual home staging.